
- The
.prop()method will disable your button, but it cannot be enabled by the end user. - Combining
.prop()with an if/else statement allows you to write practical code, such as disabling the button under a condition. - If/else statements are logical and conditional; if something is true, one thing will happen; if it's false, a different thing will happen.
.prop() Method
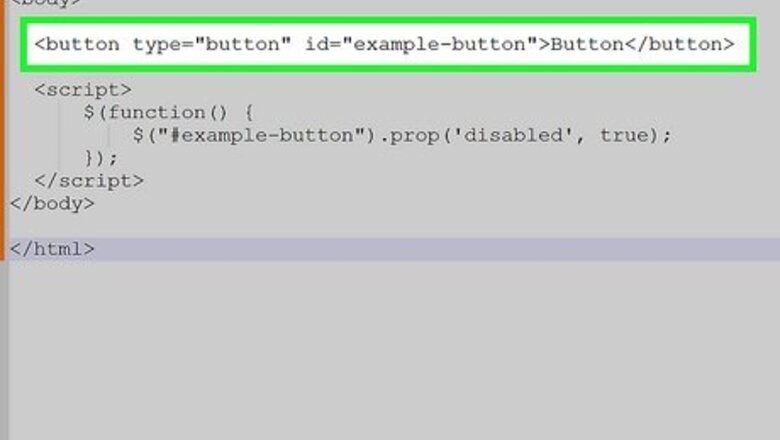
Code a button with HTML. To disable a button, you need to have one coded into your HTML. The button should have a unique ID that the jQuery code can reference. If you already have a button coded, you can skip this step, though ensure your button has an ID assigned to it.
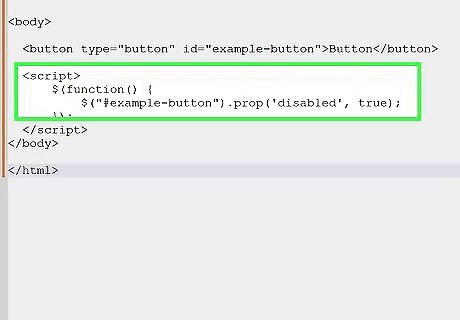
Add the .prop() method to your jQuery script. .prop() is a method that can return or set properties and the value you assign to them. While there may be a time where you need to disable a button entirely using this method, it's important to understand how the .prop() method works as it is a core part of the other method in this article. The syntax for the .prop() method to disable a button is below. The selector (#example-button) should be your button ID name. In the parentheses, "disabled" is the propertyName string, and "true" is a Boolean value. Because "disabled" is "true" for the button ID, any button with that ID will be disabled. $("#example-button").prop('disabled', true);
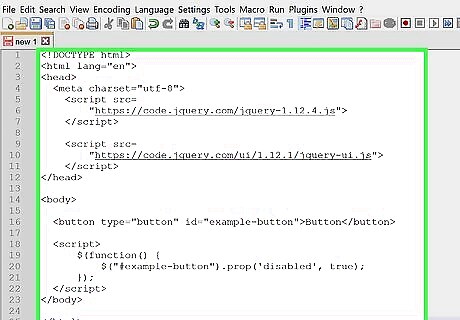
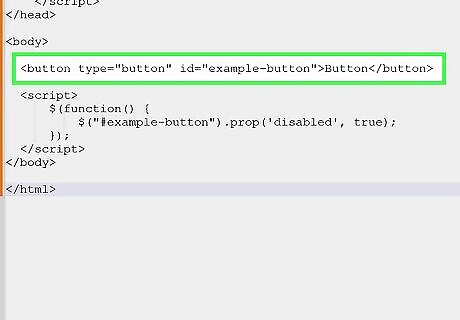
Combine the HTML and jQuery into one document. After getting your button HTML and jQuery script, you can combine these two snippets into an HTML document. Once you run the code, you will see a button that says "Button", but it is grayed out and cannot be selected.
If/Else Statement
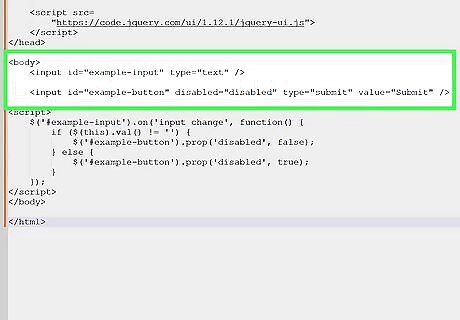
Code an input with a submit button. This could be any type of input, but for this tutorial, we'll demonstrate with a form field input. The input and button should both have unique IDs that can be referenced by the jQuery code. For this example, the save button should be disabled in the button tag to start with because the input is empty by default. Remember to replace the temporary input IDs with your own.

Create an if/else statement for the input and button. An if/else statement is a conditional statement: the first condition will execute if the condition is met, else the second condition will execute. If/else statements are a core part of programming, and while you can do any number of operations with them, we will teach you how they work by coding a script that disables the button when there is no text in an input field, and enables it if there is text present. In this method of disabling a button with jQuery, if the input area has text, the submit button will not be disabled (false), else if the input area is empty the submit button will be disabled (true). It may seem backwards that "enabled" is false and "disabled" is true, but the button starts disabled because the input area is empty. Look at the if/else statement below with example IDs filled in. Then, read below to learn about what each line of the code snippet means. $('#example-input').on('input change', function() { if ($(this).val() != '') { $('#example-button').prop('disabled', false); } else { $('#example-button').prop('disabled', true); } }); The first line defines a selector that finds an HTML element ($('#example-input')) an event that must fire (.on('input change'), and a handler that specifies a function will be executed when the event fires (function() {). The jQuery in this line is saying that when there's an input change in an element that has the #example-input ID, the following function should be executed. $('#example-input').on('input change', function() { Start with the if portion of the statement. The basic syntax is if (condition) { code to be executed if condition is true }. In the code snippet below, the condition of $(this).val() !='' means that when the input field is changed ($(this) refers to the parent object) and the value (.val()) is not (!=) empty (''), then whatever's between the brackets should happen. Between the brackets, the code is stating that if the input field has changed to a value that is not empty, then the button ($('#example-button')) should not have the disabled property (.prop('disabled', false);). if ($(this).val() != '') { $('#example-button').prop('disabled', false); } Finish with the "else" portion of the statement. The basic syntax is else { code to be executed if condition is false }. It functions very similarly to the if statement, and in our example, the code is exactly the same save for one change: false is now changed to true, because if the input field is changed to be empty, the if condition would be false, thus prompting the else code to execute (which would set the which sets the disabled property of the button to "true".) } else { $('#example-button').prop('disabled', true); }

Combine the HTML and jQuery into one document. Once the document is finished, if you run the code, you will be presented with an input box and associated submit button, but the submit button cannot be clicked until there's text in the input box. An example of what the code looks like put together is shown below. This method can be used for other input types as well, though you will need to change .val() != '' to a different action if you're not using a text-based input type. If your input is a checkbox type, for example, the first line of your if statement should be if ($(this).is(':checked')) {, using the .is() method with the :checked selector.


Comments
0 comment