views
X
Research source
Note: the FINA rules still say "freestyle" means you can swim any style you want (except for some medley events).
Freestyle involves alternating arms that make windmill arc motions forward while the head is underwater, and the swimmer breathes at the side. It is accompanied by a two or six beat flutter kick that is synced with arm strokes to stabilize the body. If you want to know how to freestyle for fun, for exercise, or for competitions learn how to move your arms, kick your legs, and breathe correctly.
Learning the Stages of the Arm Stroke
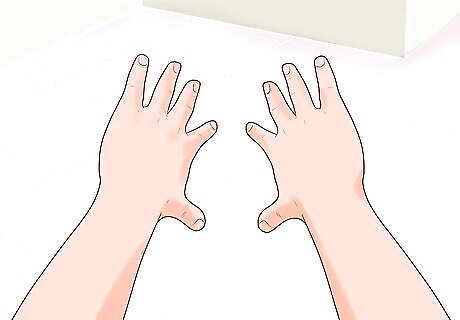
Perfect your hand placement and entry. To begin your stroke, your hands should be relaxed and your fingers should be held together. Put your hand into the water fingers first about 15 inches above your head. Your palm should be tilted at a 45 degree angle facing out so your index and middle finger enter the water first. Your wrist should be tilted down and positioned above the fingers, and your elbow will be raised above the wrist. Your hand should make as little splash as possible during entry. Once your hand is in the water, extend your arm another 4 inches Once your hand is in the water, press your hand down and out with your fingers spread out slightly. This is called “getting a feel” for the water or “the catch”. If you want to work on your hand technique, you can wear hand paddles to help you concentrate on how your hands are entering and exiting the water. Avoid putting your hand into the water just above your head. It will slow you down and hurt your technique. Do not smack the water with your arms, instead, once your hand enters the water, follow the motion and glide your arm into the water.
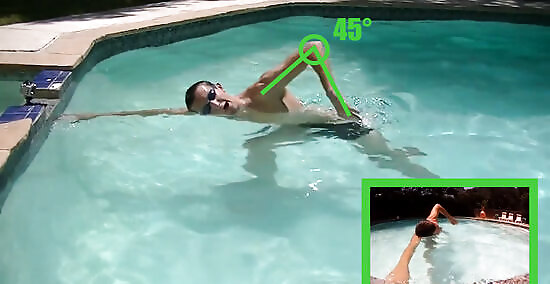
Work on your downsweep. Your arm will act as a lever during this phase of the stroke. As you stroke, your body will rotate toward the arm that is in the motion of stroking. Move your forearm and hand downward and back with your elbow held at about a 45 degree angle. Your elbow should stay high in the water during this phase of your stroke. Concentrate on going through the downsweep smoothly. This phase should happen in a rapid motion. However, avoid trying to go faster during this phase because it won’t propel you forward much but could create drag.
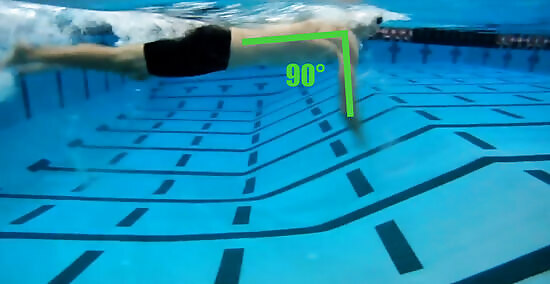
Pull your hand and forearm toward the center of your body for the insweep. During this part of the stroke, use your hand like a paddle and move as much water as possible. This is where you start to move your body forward with your arm stroke movement. It is the first part of the “propulsive” phase. And your upper arm will move inward toward your chest and ribcage. Your elbow will go starting moving into a 90 degree angle. When your hand starts to approach the midpoint of your body, you have reached the backsweep. Keep your arms closer to being under you instead of stroking at your sides.
Push your arm in an up, out, and backward motion to backsweep. This is the second “propulsive” phase where you can gain speed in your stroke. Right as your hand gets to the midpoint of your body you will stop pulling and start pushing water. Keep pushing water out and up until your arm hits the line of your thigh. This part of the stroke will be the most rapid phase and can be the most powerful at propelling you forward. EXPERT TIP Brad Hurvitz Brad Hurvitz Certified Survival Swimming Instructor Brad Hurvitz is a Certified Swimming Instructor for My Baby Swims, an adolescent swimming school based in La Jolla, California. Brad is trained as an Infant Swimming Resource (ISR) instructor with ISR's Self-Rescue® program. He specializes in training children aged six months to six years of age survival skills like floating on their back to breathe and swimming back to the wall, while also educating parents on how to better keep their kids safe. He has a Master of Business Administration from Oregon State University. Brad Hurvitz Brad Hurvitz Certified Survival Swimming Instructor Our Expert Agrees: Swimming is about efficiency, so make sure to stretch your body out as much as you can. Also, pull as much water as possible from as far up as you can reach all the way down to your thigh. Then, add a small flutter kick to help you move through the water, but try not to bend your knees too much as you kick.
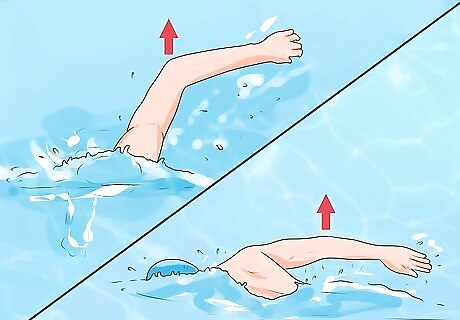
Move your elbow out of the water until it is pointing up for the release. During the release your arm doesn’t move you forward, but it does provide support for the arm which is pulling underwater. It is important to work on your release technique so that your hand entry is clean. To end your stroke, launch your hand forward in line with your shoulder out of the water. Your fingers should hang loosely above the water and your hand should swing wider than your arm. Your arm should be relaxed and should swing wide, too. Concentrate on rotating your arm forward, and do not force a down rotation at the end of the release.
Kicking and Rotating
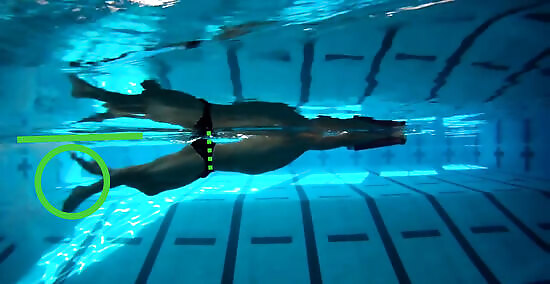
Flutter kick just below the surface of the water. Although kicking accounts for only 10-15% of the power in your stroke, it is still an important part of your freestyle technique. Keep your hips close to the surface of the water and make a series of quick kicks. You want to focus on minimizing drag while you propel yourself forward; therefore, your kicking range of motion should be narrow. Your legs should not kick out of the water and neither should they break below the line of your body. Kick from the hips and thighs. Do not kick from your knees, this is called a bicycle kick, and it will cause more drag. You may slightly bend your knees while you kick, but this should not be where your power is coming from.
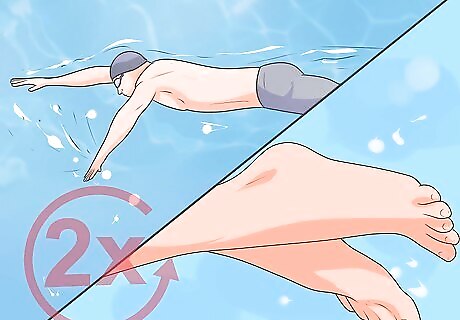
Use the two-beat kick. The two-beat kick requires less power and is used by long distance and middle distance swimmers. You kick one leg per stroke cycle. One stroke cycle means the stroke of one arm. Kick one leg in conjunction with the insweep of the opposite arm. (The insweep is when the arm starts pulling water toward the midsection of the body.) If you can think about how your arms and legs sync while you are walking, how your arm moves forward at the same time as the opposite leg, you can imagine how your kicking should be synced with your arm stroke in a similar way. The six-beat kick requires that you kick three times per arm stroke cycle. The third beat of the kicking cycle will start during the recovery phase. This is a faster kick that is used by faster swimmers.
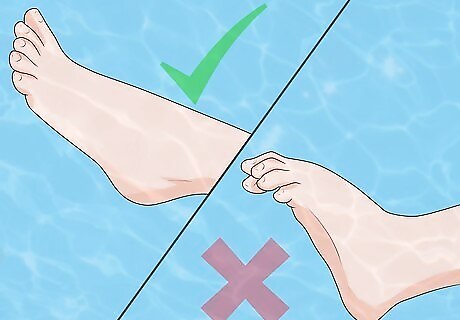
Point your toes while you kick. If your toes aren’t pointed while you kick then there will be extra drag caused by your exposed forefoot. Your toes should face inward, and your big toes should come close to touching as you kick. When you point your toes, you are exercising the flexibility in your ankles. If you are having difficulty with ankle flexibility, consider using mid-length flippers to practice your kick. You can focus on both your freestyle arm and leg techniques more easily with the extra propulsion that flippers provide. But only use your flippers to help train your feet during drills.
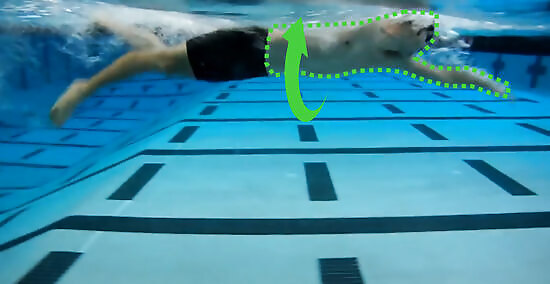
Rotate your body in line with your arm stroke. Rotating your body correctly will help you with many important aspects of your stroke. First, you can put more power into your arm stroke. Second, you will minimize drag. And third, it will enable you to breathe correctly. As you rotate your body left and right with your alternating arm strokes, your body should be moving in the water about 30 degrees from the surface on both sides. Remember to swim mostly on your stomach and not on your side. Rotate your body forward as well. Your arm and shoulders should extend forward and your body should rotate forward after your hand and arm have entered the water. Your fully extended shoulder should stay tucked near your cheek. Do not move your shoulder further away from your body, or this will cause drag. Focus on rotating your body from the hips and not from the shoulders.
Breathing and Practice Drills
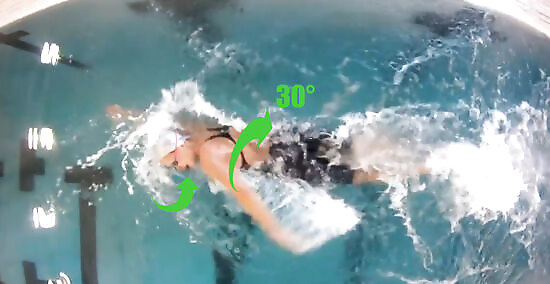
Rotate your body to the surface, and inhale through your mouth. This will allow you to keep your neck muscles and your head relaxed. If you turn just your head, you can put unnecessary stress on your neck. Keep your forehead and the crown of your head slightly submerged while you breathe. Imagine you have a wine glass balanced on the side of your head that you cannot spill. Do not over rotate. You only want tilt your body 30 degrees in one direction or the other. Do not hold your breath longer than you need to when you swim. Breathe at every stroke if you feel the need. Do not lift your head up- this will cause your hips and legs to fall, and you will have to work to regain your balance. Continue to keep your body and arms outstretched while you breathe. Keep your body straight, and do not lose your extension while you breathe.
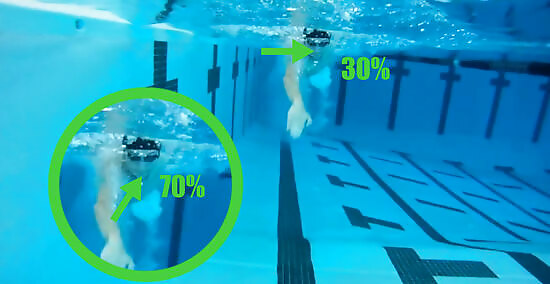
Blow bubbles out of your mouth and nose to expel your breath. If you hold your breath, you may develop feelings of anxiety while you are swimming that will slow you down and distract you. You can practice blowing out bubbles in shallow water. Exhale 70% through your mouth and 30% through your nose. And exhale the last 20% with more force. Submerge your face and sigh or hum through your nose or mouth to create a stream of bubbles. While underwater, make sure to exhale out all of the air so that you are not having to exhale any last bit of air when you should be inhaling.
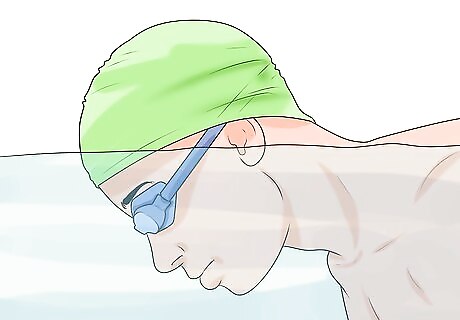
Hold your forehead just under the water while you swim. The water should rest between your hairline and your eyebrows. Keep your neck and upper-back muscles relaxed while you swim. Your head should be cocked about 45 degrees forward. If you move your head down too much toward your chest, it will cause more resistance. EXPERT TIP Alan Fang Alan Fang Former Competitive Swimmer Alan Fang swam competitively for over 7 years, through high school and into college. He specialized in breaststroke events, and participated in events such as the Speedo Championship Series, the IHSA (Illinois High School Association) state championships, and Illinois Senior and Age Group state championships. Alan Fang Alan Fang Former Competitive Swimmer The angle makes a difference. Alan Fang, a former competitive swimmer, says: "You shouldn't be looking directly at the bottom of the pool, but you don't want to look directly forward, either. Try to keep your head at a decline somewhere in the middle."
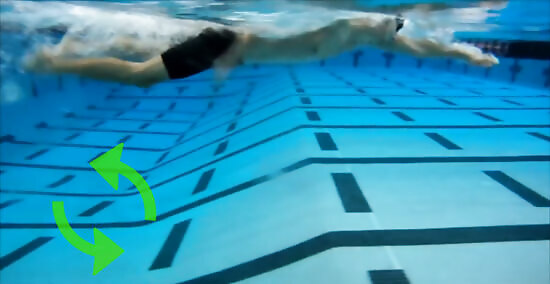
Practice your stroke and breathing techniques. Work on isolated parts of your stroke and breathing techniques through practice drills on land and in the water. Concentrating on different parts of your stroke that you need work on will help you develop a stronger complete stroke. Practice your arm stroke, body rotation and head position on land. Bend forward at your waist, and go through the five stages of the arm stroke: entry, downsweep, insweep, backsweep, release. Practice rotating your body correctly, and practice keeping your head still at the side when you breathe. Rotate your shoulders to work on a longer stroke. Over exaggerate the rotation while you practice, and it will help create muscle memory for when you swim. Do breathing drills. Kick off the wall and keep your right arm extended in front of you. Use your left arm to stroke, and on your second stroke, take a breath on your left side. Practice blowing bubbles out of your mouth and nose completely and inhaling a full breath through your mouth. Then alternate sides and do the same drill on your right side. This will help you become comfortable with your inhaling and exhaling techniques and establish a breathing pattern. Concentrate on only rotating enough for you to get a full breath. Practice kicking drills. Push off the wall with your feet and extend your hands and arms out in front of you. Keeping your head underwater, kick vigorously for as long as your breath will last. You do not want to focus on going fast, instead, try to focus on your technique. Keep your toes pointed, your feet pointed inward so your toes are almost touching, your hips up, and your kick high. Keep your legs relaxed, and kick from your thighs. Repeat this drill 3-4 times.
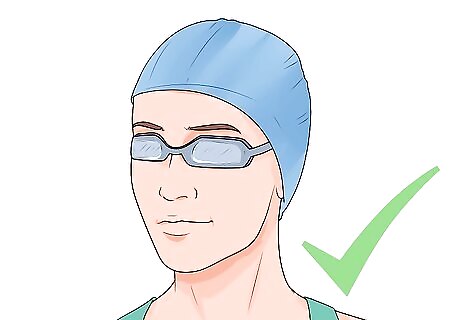
Wear goggles while you are swimming. You do not have to wear goggles to swim freestyle; however, when you have to close your eyes while you swim, it can make you anxious. And it will make it more difficult to concentrate on your stroke. When you wear goggles, it can help you stay balanced and oriented. You will know when to stop because you will be able to see the walls of the pool, and you won’t have to worry about bumping into other swimmers. Adjust your strap, pulling the straps until the goggles fit on your face firmly and comfortably. Adjust the nose bridge. Pull on both sides of the strap if the nose bridge is a strap. The nose bridge fits properly if you press your goggles up to your eyes and they suction to your eyes without a problem. Fit the goggles to your head by putting the eye cups up to your eyes so that they suction to your face, and then with your thumbs, move the strap behind your head so that your goggles are firmly in place.







Comments
0 comment