views
Indenting Before Baking

Choose a drop cookie recipe. There are two main types of cookie recipes: drop cookies and rolled-out cookies. The best type of cookie recipe to use for this method is the drop cookie, where you roll it out into a ball, then drop it onto a baking sheet. You can also use a refrigerated, store-bought recipe. Most chocolate chip cookies will be drop cookies. Many sugar cookie recipes will also work.

Grease the inside of one or two mini muffin tins with cooking spray. A single batch of cookie dough will be enough to fill two mini muffin tins. You can cut the dough in half, however, and use it to fill just one mini muffin tin. You should grease the tin even if it says nonstick; this will make the cups easier to remove.

Preheat the oven and prepare the cookie dough according to the recipe. What temperature you preheat the oven to depends on the recipe that you are using. For most recipes, this will be 350°F (177°C). Follow your recipe closely. When you finish kneading the dough together, stop.

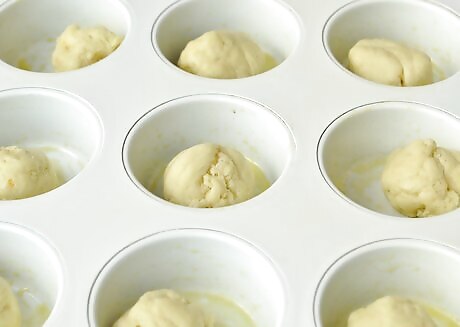
Scoop small balls of dough into the greased muffin tin. Roll the dough into 1-inch (2.54-centimeter) balls, or form them using a cookie scoop. Drop each ball into a well in the muffin tin. Plan on using about 1 tablespoon (15 ml) of cookie dough for each well.

Shape the balls. Press the balls into the bottom of each well. Use a wooden spoon handle or your thumb to make a well in the middle of each ball. Press the dough against the bottom and sides of the cup. Only make them go two-thirds of the way up.

Bake the cups for about 10 minutes. Keep in mind that the baking time may vary depending on your recipe. The cookie cups are ready when they are lightly browned on the edges.

Reshape the cups, if needed. Sometimes, the cookies will puff out while they bake, and the wells will become smaller. If this happens to you, press down onto the center of each cup with the handle of a wooden spoon. You must do this right after you take the cups out of the oven, while they are still warm and in the muffin tin.

Remove the cups from the tin and allow them to cool. Let the cups cool for about 5 minutes first. Invert the tin and let the cups fall out. Transfer the cups to a wire cooling rack and allow them to finish cooling. If any cups are stuck in the tin, pry them loose with a paring knife.

Use a piping bag or a small spoon to fill the cups. These cups are really small, so you won't be able to fill them with large amounts of dessert or ice cream. You can turn them into mini pies and desserts, however. Ideal fillings include: Custard or pudding Mousse No-bake cheesecake Whipped cream and a sliced strawberry
Indenting After Baking

Choose your favorite drop cookie recipe. There are two types of cookies: the type that you roll out and cut into shapes, and the type that you roll into balls and drop onto a baking sheet. Choose a cookie recipe where you roll the dough into balls and drop onto a baking sheet. You can also use a store-bought, refrigerated dough instead. Try a soft chocolate chip cookie recipe or a soft sugar cookie recipe.

Grease the inside of a standard-sized muffin tin. You can also use two 6-well muffin tins, as long as they are both standard sized.

Preheat your oven and prepare the cookie dough. How you prepare the dough depends on the recipe, as each one will be a little different Follow the recipe exactly. Stop when you finish mixing and kneading the dough. Most recipes will tell you to preheat the oven to 350°F (177°C), but your recipe may be different.

Scoop the dough into the greased muffin tin. You can do this with a large cookie scoop or with an ice cream scoop, but make sure that each well has the same amount. The cookie dough will spread out in the wells and fill them. Don't indent anything yet; you'll do that at the end.

Bake the cookie cups for about 15 to 16 minutes. Keep in mind that the exact baking times may vary depending on the recipe that you used. The cookie cups are ready when the edges start to turn brown. Have a small spice jar ready for the next step.

Indent the cookie cups with a spice jar. As soon as the cookie cups finish baking, take the muffin tin out of the oven and place it onto a heat-safe surface. Press a small spice jar into the center of each cookie cup to make a well. Do this while the cookie cups are still warm; do not wait for them to cool. If you have another muffin tin, you can use it to indent the cookie cups instead. Simply place it on top of the cups, and press down on it lightly.

Allow the cups to cool before removing them from the tin. Let the cups cool in the muffin tin for about 10 minutes. Invert the muffin tin, and let them drop out onto the counter. Place the cups onto a wire cooling rack, and let them finish cooling, about 10 minutes more. If a cup gets stuck in the tin, you can twist it loose or pry it out with a paring knife.

Fill the cups. Use a spoon to fill the cups with your favorite filling. Great ideas include custard or pudding, mousse, or no-bake cheesecake. For a cold, tasty treat, scoop some ice cream into each cup, then put them into the freezer to freeze and harden.
Using the Back of a Muffin Tin

Choose a cookie recipe where you have to roll out the dough. You can use just about any type of cookie dough recipe for this method, but the kind that works the best is the roll-out-and-cut kind. Avoid using the type of dough where you have to roll onto balls and plop onto a baking sheet; they will spread too much and make a mess. Crunchy, shaped sugar cookie recipes will work especially well for this. Some chocolate chip cookie recipes may also work. Not all store-bought cookie dough will work for this. Read the baking instructions on the package to ensure that it's the roll-out kind.

Cover the back of two standard sized muffin tins with foil. Flip two standard sized muffin tins upside down. Cut some aluminum foil into 12 5-inch (12.7-centimeter) squares. Cover every other cup on each tin with a foil square, making sure that the shiny side is facing up. Spray the foil squares with nonstick cooking spray when you are done. Each muffin tin should have six foil-covered wells. Staggering the cups like this will prevent the cups from fusing together. Make sure that you are molding the foil squares over the back of each cup, not the inside.

Prepare the cookie dough according to the recipe. Do not preheat the oven yet. Most kinds of roll-out cookie dough recipes have a chill period. If yours doesn't, consider wrapping it in plastic wrap and refrigerating it for at least 2 hours. This will make the cookie dough easier to work with. Preheat your oven once the dough finishes chilling. For most recipes, this will be around to 350°F (177°C).

Roll half of the dough between two sheets of lightly-floured wax paper. Spread out a sheet of wax paper on your counter. Lightly coat it with flour, then place the dough on top. Dust a second sheet of wax paper with more flour, then place it on top. Roll the dough out until it is ⅛-inch (0.32-centimeter) thick. Keep the other half of the dough covered with plastic wrap in the fridge.

Cut the dough into six circles. Use a 3½ or 4-inch (8.89 or 10.16-centimeter) cookie cutter for this. You can also use a glass, jar, or small bowl with the same diameter instead.

Drape the cut dough circles over the prepared muffin tin. Only drape the dough over the wells that are covered with aluminum foil. Gently press the dough against the sides of each well. It won't reach the bottom of the tray, which is fine; the dough will spread during baking. Again, you are draping the dough over the back of the tin, not the inside. Keep the cookie cups staggered. You don't want them touching. This will prevent fusing.

Chill the tin in the freezer while you prepare the other one. Once you have finished draping the size cookie dough circles over the back of your muffin tin, put the entire tin into the freezer. Leave it there for 10 minutes while you repeat the process on the other muffin tin.

Bake the cookies in a preheated oven at for about 12 to 15 minutes. If you have not already, preheat your oven to the temperature specified in the recipe. Bake the cookie cups for about 12 to 15 minutes, or until the edges turn golden-brown. Resist the urge to remove the cookies from the tin after baking. Let the second muffin tin chill in the freezer while the first one bakes.

Let the cookie cups cool off completely on the tin. This will take 10 to 15 minutes. They must be completely cool before you remove them. If you take them off while they are still warm, they will break. Peel the aluminum foil away from the cookies once you remove them from the tin. If the cookie cups fused together during baking, cut them apart while they are still warm.

Fill the cookie cups. Take them off of the muffin tin first, then peel off the aluminum foil. Fill them with your favorite dessert filling. Great options include: Custard or pudding Ice cream Fruits and cream Mousse No-bake cheesecake


Comments
0 comment