
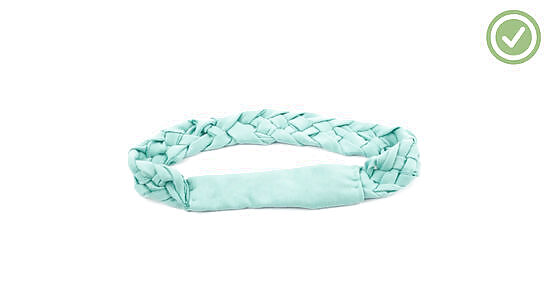
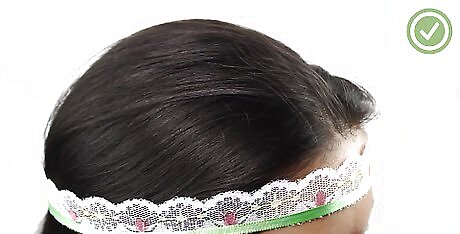
Making an Elastic Ribbon Headband
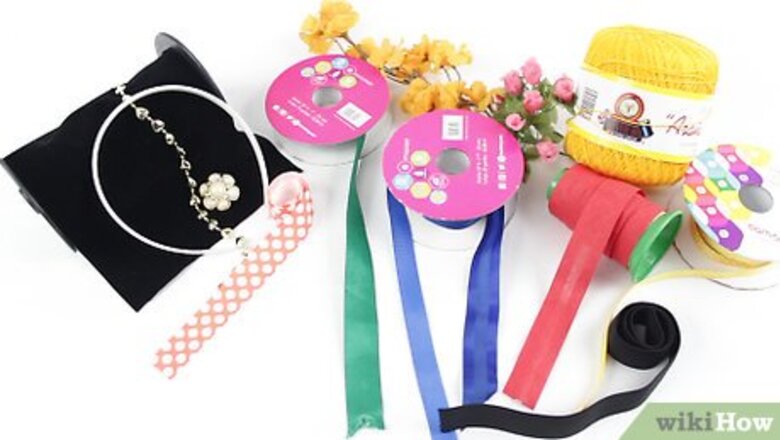
Choose the ribbon or trim. Craft stores are loaded with cute ribbons and trim. For this project, it is best to choose a ribbon or trim that is thin, measuring 1” wide or less. Ideally it will be the same width as the elastic you use. If you choose ribbons or trim with embellishments like beads and sequins, make sure that they are only on one side of the ribbon. This way, it won’t get caught in your hair. When possible, choose trim and ribbon that contains a bit of elastic in the fabric to make wearing more comfortable. Tug on the ribbon or trim to see if it stretches. If it does, then it contains some elastic. You can also use elastic-free ribbon or trim with no issues though.

Buy some elastic. Most fabric and craft stores offer spools of elastic in different colors and widths. You will want to find elastic that is thinner than the ribbon or trim you have chosen, so make sure you know the measurements of your ribbon. Elastic usually comes in black and white, but you may be able to find other colors as well. Keep in mind that the elastic will be on the bottom half of the headband, but it may still be visible when you wear it.
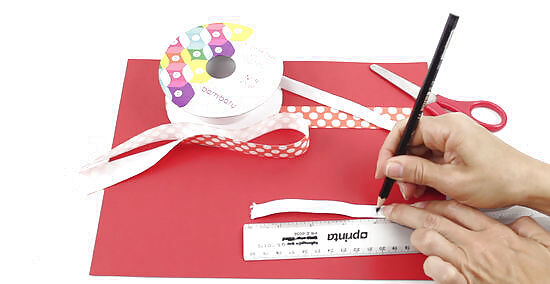
Cut the pieces to size. Next, you will need to cut the ribbon and elastic so that the ribbon is long enough to wrap around most of your head and there is a few inches of elastic connecting the ends of the ribbon together. Measure them around your head first to determine how long you will need your ribbon to be. Wrap the ribbon you’ve chosen all the way around your head from the top of your forehead to the nape of your neck, or where you would like your headband to sit. Place your finger on the end of the ribbon where the ribbon begins to overlap itself and mark it with a pen or a bit of chalk. Measure five inches inward from this spot that you have marked, and then cut the fabric here. Next, cut four inches of elastic band. This material will connect the two ends of your ribbon. It is important to leave an inch off the total measurement of elastic so that the headband will sit tight enough on your head to prevent it from sliding off. If you want an even tighter headband, you can always use a little less elastic.

Sew the ribbon and elastic together. Use a needle and thread to create a small seam at the ends of the ribbon or trim. To do this, fold over the edge of the ribbon or trim and then sew to hold this seam in place. Next, use the needle and thread to sew the elastic to the underside of the seam you just created. If you are using a type of trim that would be difficult to fold over and add a seam or that does not look like it needs one, then you can skip the seam and just sew the elastic to the ends of the ribbon or trim. Make sure to tie a knot in the thread ends to ensure that they stay put.

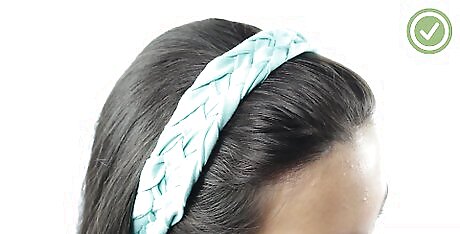
Wear your new headband. After you finish sewing the elastic to the ribbon or trim, your headband is complete. You can choose to layer it underneath your hair or wear it in the popular bohemian style wrapped over your forehead.
Making a Braided T-Shirt Headband

Get an old t-shirt. Find a shirt that is relatively large and made out of a stretchy jersey-like fabric. If you don’t have one on hand, you can purchase one meeting these criteria from thrift stores for very cheap.

Measure and cut the fabric into strips. You will need to use a sharp pair of scissors to cut five long strips out of the t-shirt. Measure the length around your head from just above your forehead to the nape of your neck. Then, use this measurement to cut five pieces of fabric of the same length and about 1” wide from your t-shirt. Cut an additional piece that is 3” wide and ⅓ the circumference of your head.

Sew together the ends of the five strips. To secure the ends of the fabric before you start braiding them, use a needle and thread or sewing machine to sew over the ends of the pieces of fabric. Make sure that the ends are all lined up before you start sewing. You can simply stack them on top of each other.

Braid the strips. Once your strips are sewn together at the ends, you can begin braiding them. You will be doing a five strand braid, which can be a little tricky. You may want to tape the end that you have just sewn to a surface to keep it in place while you braid. Start by braiding with three strand on the right side. Then, as you continue braiding work towards the left side and grab pieces from that side to incorporate into the braid. Keep working back and forth until you have braided all of the fabric together. Tighten the pieces as you weave by pulling on them when they reach the left side. It will appear slightly bunched when you begin, but will flatten out as you continue the weaving pattern.
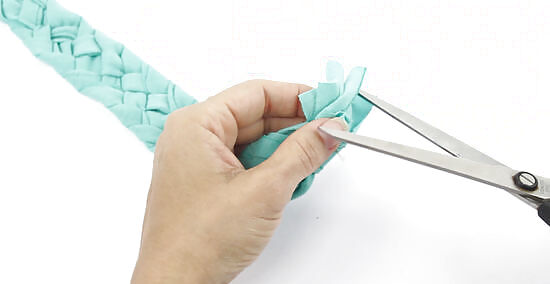
Sew the other end. When you get to the end of your braid, sew all five strips together at the other end. Use a needle and thread or sewing machine to sew over the strips as you did before. This will secure your braid.
Complete your headband. The completed woven strip will have shrunk to be about ⅔ of the total distance around your head, and it will need to be longer to fit your head. You will also need to connect the ends to form the braid into a band. To do this, take the additional piece of fabric cut to 3” wide and attach it to the ends of the braid. Sew the shorter/wider piece to the ends of your braid with a needle and thread.
Try on your headband. Your headband is now complete and you can try it on. Make sure to position the unwoven piece of fabric you added at the end so that it is on the underside of your head.
Decorating a Hard Shell Headband
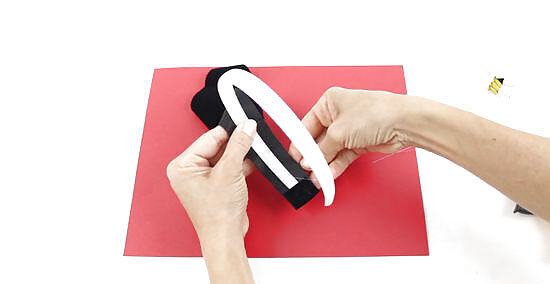
Wrap your headband in fabric. Wrapping an old hard headband in fabric is an easy way to repurpose it. You only need a piece of fabric and some glue to do this. Measure the width of your hard headband, and then choose a piece of fabric that is twice as wide and equally as long. Cut the fabric into a rectangle with those measurements. Wrap the fabric around the hard headband, and attach the fabric to the underside of the headband with some fabric glue. Tuck the ends of the fabric under as well to create smooth ends.

Cover your headband in yarn or string. There are many lovely shades of yarn and embroidery floss available. Find a few you like and use them to wrap a headband. Coat the entire headband in a thin layer of glue. Then, begin at the inside bottom end of one of the headband pieces, and wrap your yarn or string in tight rings around the headband. Continue until the entire headband is covered, and then cut the excess. Seal the ends with an extra dab of glue

Add a beaded applique or bunch of feathers. Choose a pretty brooch, fabric applique, or grouping of feathers and decide on the perfect location for them on your headband. Then, use hot glue to attach them. Make sure to use caution when using hot glue! You can also use fabric glue if you prefer.
Making Other Styles of Headbands
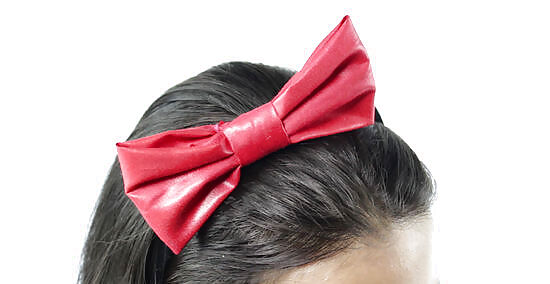
Make a bow headband. This is perfect for a day you want to add a girly look to your favorite outfit; simply use your favorite fabric scraps and a hard headband to form a pretty headband with a bow. Feel free to adjust the size and number of bows to your liking.

Try your hand at a flower headband. These floral headbands have become very popular with a rise in indie fashion. Learn how to create a headband that gives the illusion of a halo of flowers with these simple directions.
Create a hippie headband. If your headband is less for utility and more for style, try making a cute hippie headband that wraps around your forehead. This style secures your hair to your head while adding a unique accessory to accentuate your face.

Make a sparkly headband. To add a bit of glam and glitz to your hair, use these step-by-step directions to create a pretty sparkly headband. You could use glitter, sequins, or beads to make your hair shine.

Knit your own headband. If you love to knit and want to keep frizzy hair out of your eyes, combine your talent and desire to create a knitted headband. Choose any color you like, and spend a little time making your own knitted headband.


Comments
0 comment