
X
Research source
[2]
X
Research source
It is often regarded as an alternative to the hugely popular MediaWiki.[3]
X
Research source
While originally designed for maintaining documentation, it can also be used for other tasks like keeping a personal wiki. Read on for simple instructions on how to install it and start basic pages!
Disclaimer: Before making your wiki public, ensure you take all necessary security steps. This article is only meant for a quick, private start.
Preparing
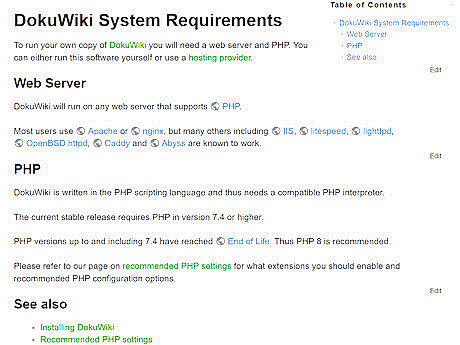
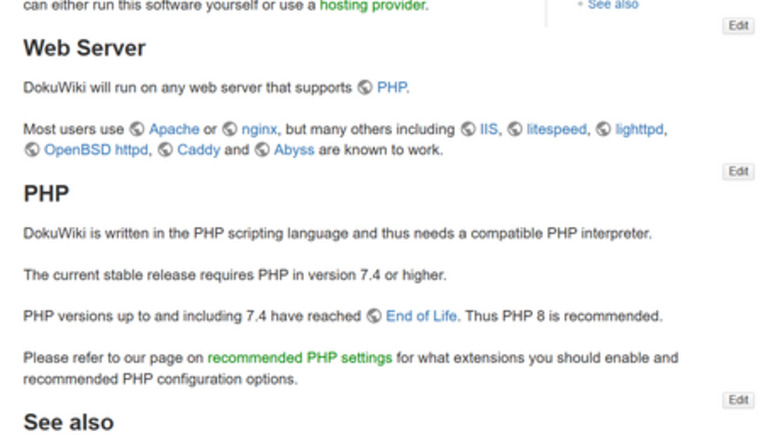
Ensure you meet the system requirements. DokuWiki is known to have minimal requirements, which can be found at https://www.dokuwiki.org/requirements. You will need a PHP Engine of version 7.4 or higher to run the latest stable release as of January 2025. If you already have PHP installed, check its version to ensure you're good to go. A web server is also needed for hosting the wiki. Instructions for using a hosting provider can be found here. Locally, XAMPP is a popular choice for a private web server.
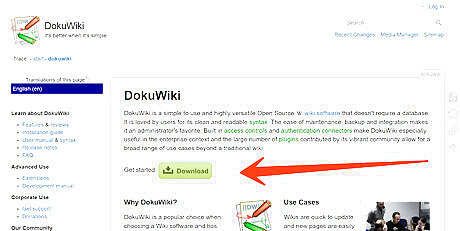
Access the download page. To do so, go to the DokuWiki main page located at https://www.dokuwiki.org/dokuwiki and click on the green Download button. Alternatively, you can simply follow the direct link by copying and pasting it into your browser's URL bar and hitting ↵ Enter or by just clicking on it here: https://download.dokuwiki.org/.
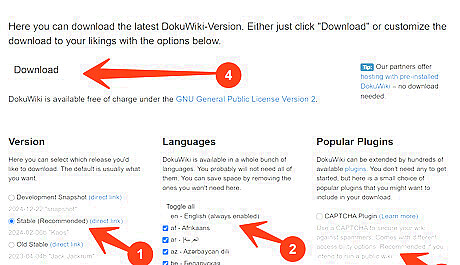
Customize the download. The page has many customization options you can use to your liking. Once you're done, click either the large Download button at the top or the Start Download button at the bottom to start your download! From the Version tab, choose the recommended latest stable release. DokuWiki is available in a multitude of languages. Check/uncheck the boxes next to the languages you want/don't want to be included in your installation. (Consider using the Toggle all button for convenience.) English is always enabled. Choose any optional plugins. Plugins like Wrap Plugin and Gallery Plugin are helpful if you'd like to expand stylistic choices on your wiki, while plugins like CAPTCHA Plugin can help on the security front, especially if you plan to make your wiki public. If you're making your wiki for single-user/personal use, you might want to include a minimal web server with PHP. Doing so could help you run your wiki from a USB stick alone. Scroll down to find the option to do so.
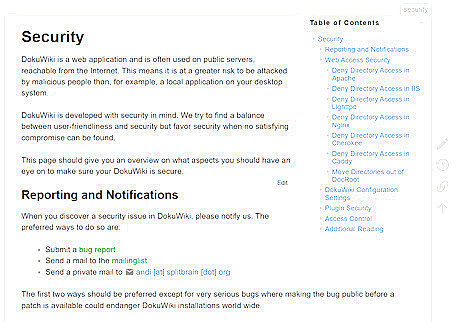
Read the security page. It can be found at https://www.dokuwiki.org/security. Be very serious about it. If you are in doubt, ask the mailing list. It includes a lot of different things, like: Reporting and Notifications Web Access Security DokuWiki Configuration Settings Plugin Security and more.
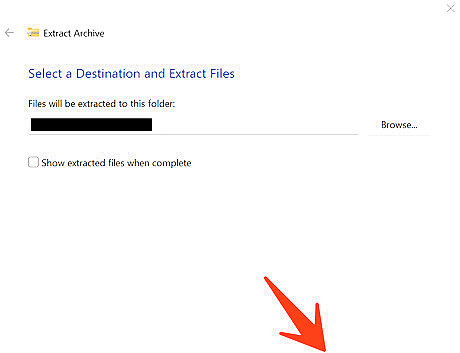
Extract the file in a new directory. The downloaded file would likely be in tar format, so you can use programs such as 7-Zip to access the contents. On Windows, right-click the file (using a mouse or the keyboard) and click on the extract button. Then follow the on-screen instructions to proceed. General instructions can be found here. Instructions for PC & Mac can be found here. Instructions on using the Windows command line to extract can be found here. Instructions for Linux can be found here.
Installing
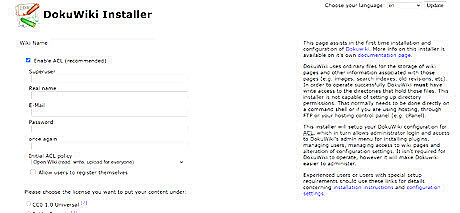
Open the install.php file in your browser. Simply choose an internet browser (like Google Chrome, Mozilla Firefox, or Opera) and open the install.php file from the extracted contents. This page is used for assistance with the first-time installation of DokuWiki and its configuration.
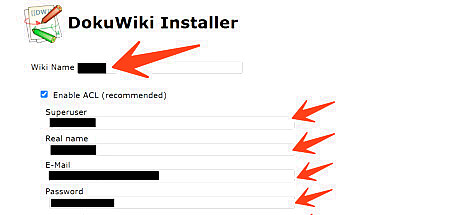
Choose a name for your wiki and create your wiki account. In the "Superuser" field, pick a username that is both unique and safe at the same time. Enter other required details. Beware that this account will be granted administrative privileges on the wiki; therefore, it should have a secure and manageable password. If you're not using a password manager (such as KeePass), make sure it is easy to remember. EXPERT TIP Brandon Phipps Brandon Phipps Technology Specialist Brandon Phipps is a Technology Specialist based in Bakersfield, CA. He is the owner of Second Star Technologies and specializes in Managed IT Services for small and mid-sized businesses in Bakersfield, CA. With over 23 years of experience, he offers expert cloud computing, cybersecurity, and network management solutions. Brandon is a committed community member and coach who leads and innovates in tech and sports coaching. His dedication to local businesses and communities is evident in his hands-on, tailored approach to IT solutions. Brandon Phipps Brandon Phipps Technology Specialist Secure your digital life with online password best practices. Choose a long, easy-to-remember passphrase as your password. You should also avoid using the same password for multiple services or websites. The username should only be in lowercase and ASCII characters, excluding any spaces. No advanced checking is done for the Email field (it should contain the @ symbol), but it is advised to supply a valid email address. You aren't logged in by default after installation is complete, so make sure you remember your username and password.
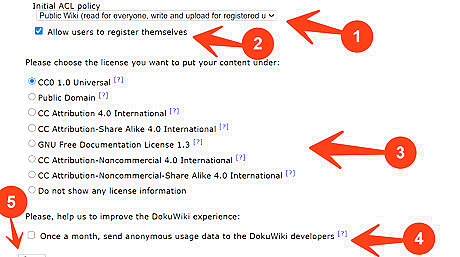
Configure other settings to your liking. Wisely choose the initial ACL policy and decide if you want to allow/disallow other users to register themselves on the wiki. Decide the license under which the content would be put. The options include a variety of Creative Commons licenses as well as other ones like Public Domain. If you'd like to, you can choose to send anonymous usage data to DokuWiki developers. Once you're done configuring, click the Save button, which can be found at the bottom of the page. The settings you choose here will be very important, so make sure to make good decisions.

Acknowledge the message. In an ideal successful scenario, you'll see something along the lines of "The configuration was finished successfully. You may delete the install.php file now. Continue to your new DokuWiki.". If you want, delete the install.php file. It can be found by navigating to the directory. Follow this how-to article to delete a file if you're on a PC. To follow the steps given further below and to explore your new wiki, click on the "your new DokuWiki" link.

Know how to handle errors. If you're not completely sure, it'd be best to ask for help. Here is a non-exhaustive list of errors that may pop up during the process: "___ is not writable by DokuWiki. You need to fix the permission settings of this directory!" is a very common error during installation. If you get this message, a common fix is to make the indicated directory writable by the web server. "PHP function ___ is not available. Maybe your hosting provider disabled it for some reason?" is a probable indicator of an outdated PHP version.
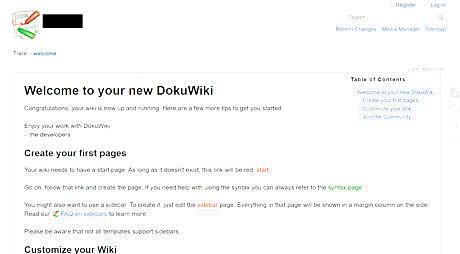
Done. Congratulations on installing your new wiki! Once you land on the main page, you'll see the standard welcome page with some instructions to help you get started. Check out the DokuWiki manual to discover DokuWiki's possibilities. If you're familiar with MediaWiki and are observant, you may notice some UI changes, like the omission of the default sidebar and the repositioning of some common buttons like Edit from the top to the right-hand side.
Logging in
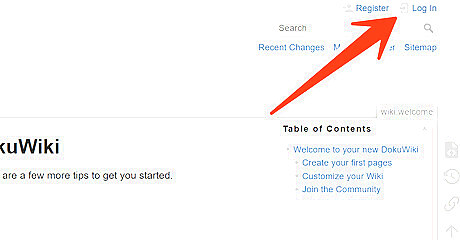
Access the login page. A link to it will be present on the top-right of the page beside a door sign. Note that you need to enable cookies in your web browser to be able to log in. Specific instruction sets to do so for popular browsers are linked below: Google Chrome Mozilla Firefox Safari Microsoft Internet Explorer
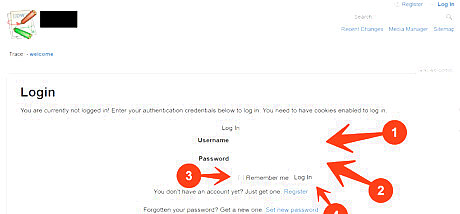
Log in with the superuser account. Remember the account credentials you entered while in the installation process, and enter them in the "Username" and "Password" fields. Then, decide on whether you would like to be remembered (i.e., remain logged in on the same device). Once done, click on the Log In button.
Making the Start page
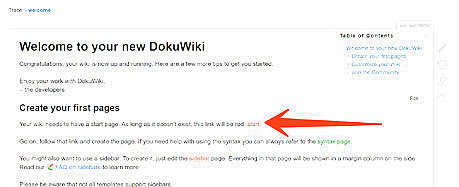
Access the start page. On the welcome page, look for the first paragraph under the "Create your first pages" subheading. At the end of the line, you'll see a red link to the start page—that you can use to navigate to it. This page would essentially be the "main" page of the wiki, replacing the welcome page. The red link signifies that the page does not exist. To make creating articles much more efficient, it would be a good idea to brush up on some wiki syntax. A comprehensive guide on wikitext is available here.
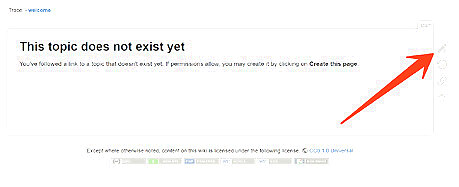
Initiate page creation. Since you are on a non-existent page, DokuWiki will inform you of so. Double-check what page you're about to create by looking at its name present above the top-right corner of the main content space and click the pencil icon provided in the right-hand side toolbar. Once you have created the page, in the future, you can use the same pencil icon-ed button to edit it as well.
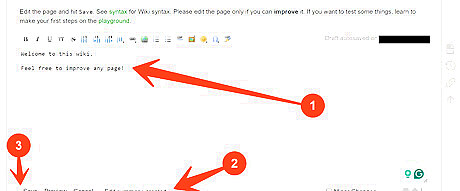
Construct the start page. Consider it to be the landing page of the wiki. You may choose to include things such as a generic welcome and a description of the wiki's theme and content. On the left side above the edit textbox, you can use the array of options present in the toolbar or use wiki syntax manually to extend beyond basic text. Once done, enter a suitable edit summary in the "Edit summary:" field, such as "Creating start page" or similar. Afterwards, click Save at the bottom left of the edit box.
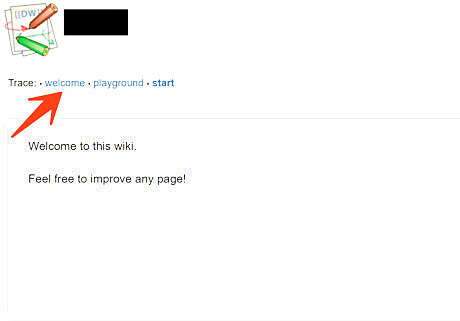
Done. You have successfully added a start page to your wiki. This becomes the main page, i.e., users will be shown this page when they visit your wiki instead of the default welcome page. If you're looking to keep things pretty basic, you can stop right here in this tutorial. However, if you wish to, you can add a sidebar or further configure your installation, both of which are explained further into this article. You may now return to the welcome page by using the "Trace:" section at the top, which will be helpful for adding a sidebar to your wiki.
Adding a Sidebar
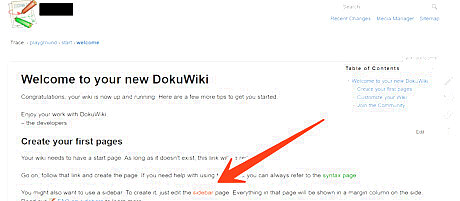
Access the sidebar page. On the welcome page, look for the third paragraph under the "Create your first pages" subheading. In the second sentence, you'll see a red link to the sidebar page—that you can use to navigate to it. Whatever that page would include would be displayed in a margin column on the side of your wiki. The red link signifies that the page does not exist. To make creating articles much more efficient, it would be a good idea to brush up on some wiki syntax. A comprehensive guide on wikitext is available here.
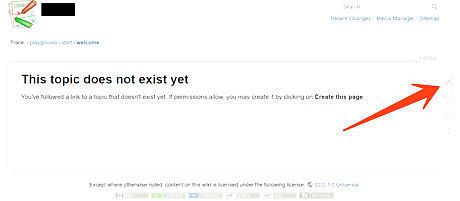
Initiate page creation. Since you are on a non-existent page, DokuWiki will inform you of so. Double-check what page you're about to create by looking at its name present above the top-right corner of the main content space and click the pencil icon provided in the right-hand side toolbar. Once you have created the page, in the future, you can use the same pencil icon-ed button to edit it as well.
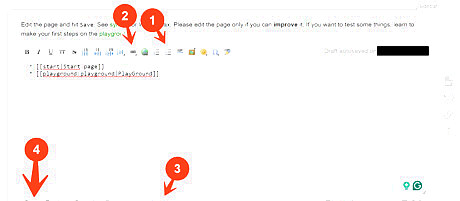
Construct the sidebar. Once you're in the edit window, you can use the various options in the toolbar to add, say, unordered lists and internal links to important parts of your site. This could include things like your start page, the default playground, etc. This list may be expanded as your wiki grows further. Note that the content you add here will show on almost all parts of the wiki. Once you're done, enter an edit summary in the "Edit summary:" field, such as "Creating sidebar" or similar. Afterward, click Save at the bottom left of the edit box.
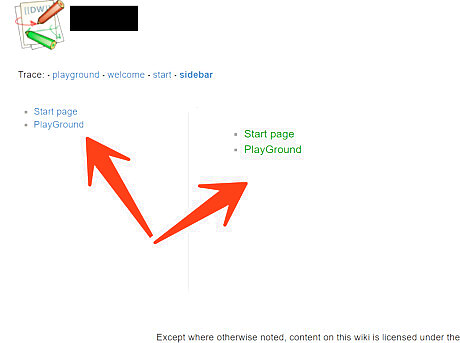
Done. Notice that immediately after you click Save, the page will show whatever you added. Ideally, there would be plenty of margin space between the sidebar and the main text body. You may now return to the start page by either using the "Trace:" section at the top or by clicking a link to it from the sidebar if you had added it in the previous step.
Further Configuring
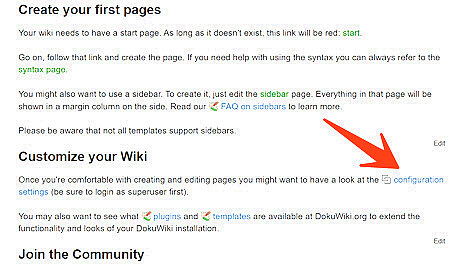
Access configuration settings. To do so, return to the welcome page (located at wiki:welcome) by clicking on the welcome link in the trace toolbar. Once you're there, scroll down to find the link in the first paragraph under the "Customize your Wiki" subheading. Then click on it. Ensure you're logged in as superuser beforehand.
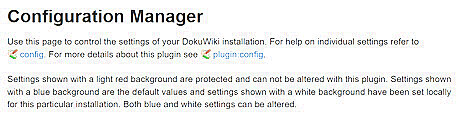
Use the Configuration Manager. On the page, some fields may have different background colours, indicating their setting method and whether they can be altered with the particular plugin or not: A light red background means that it is a protected setting that can't be altered with the particular plugin. A blue background means it is the default value, and it may be altered. A white background means it is the default value; it may be altered, and it has been set locally for this particular installation.
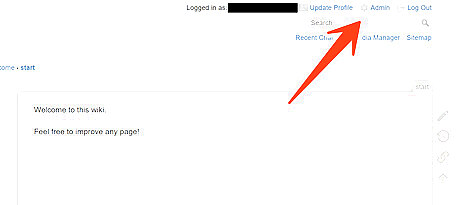
Access the admin page. To do so, go to any normal content page (like the start page or the welcome page) using the trace toolbar or the URL bar/address bar. Then look for the "Admin" option on the top-right of the header and click on it. It will have a greyed-out version of a cog symbolAndroid 7 Settings. Ensure you're logged in as superuser beforehand.
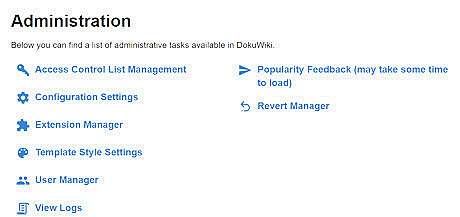
Use the administration page. Access various configuration pages through the links provided. Make sure to take all necessary security steps before making your wiki public. There are multiple settings pages, including: Access Control List Management Configuration Settings You can also access these from the welcome page (wiki:welcome) as shown in the steps above. Extension Manager Template Style Settings User Manager View Logs Popularity Feedback Revert Manager


Comments
0 comment