views
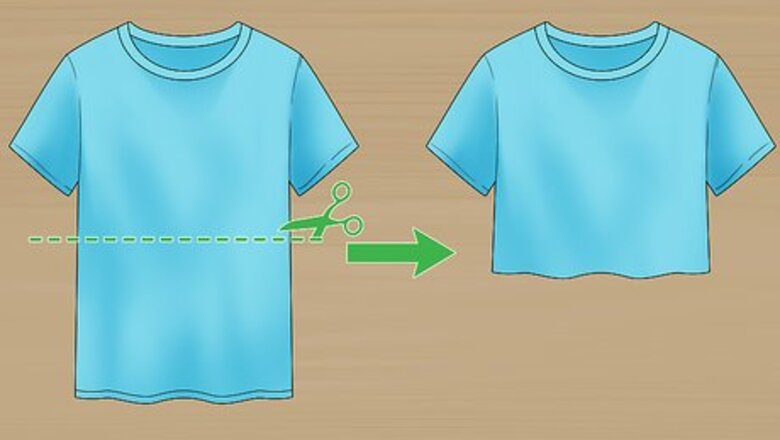
- Turn a baggy graphic tee into a trendy crop top by using fabric scissors to chop off the bottom half of the shirt.
- Cut slits into the sides or back of a t-shirt and weave the cut fabric together for an edgy and tight-fitting design.
- Gather and wrap fabric together at the shirt’s sleeves or back neckline to add bow-like accents to a larger shirt.
Simple Hem, Neck, and Arm Cuts
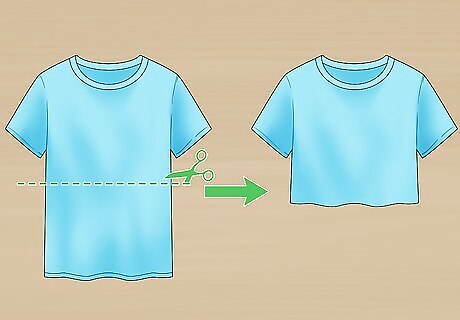
Cut your t-shirt into a crop top. Take a pair of fabric scissors and chop off the bottom half of a long or baggy shirt to make it into a super cute and trendy crop top. Use a fabric tape measure and pencil or erasable fabric marker to draw a straight line from either side of the shirt. Then, start cutting—it’s as simple as that! Put your t-shirt on before you start chopping. This way, you can get a feeling for how much you want to cut off before putting scissors to fabric. Start by cutting off a smaller amount, then try the shirt on again. Make any additional cuts if you want the crop top to be shorter. Try making a pattern while you cut for a more personalized and edgy look. Cut triangles or diamonds into the hem, or make vertical cuts to create a bohemian style fringe. If you’re cutting a graphic tee, consider cropping it just below the graphic design.
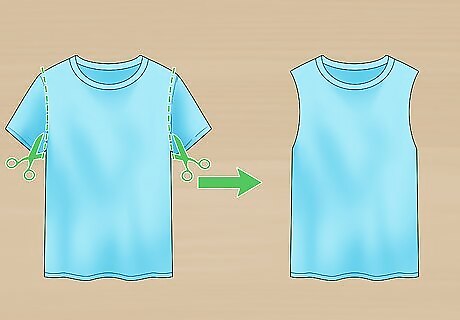
Chop off the sleeves to make a tank top or muscle tee. If the sleeves of your shirt are too big or bothersome, consider cutting them to turn the shirt into a tank top. Simply cut along the armhole seams of each sleeve. The further down the sides you cut, the wider the arm holes will be. Consider cutting out the neckline seam as well for a more distressed and slouchy look. Take this design even further by trimming the bottom hemline, gathering the material across your stomach, and tying a knot.
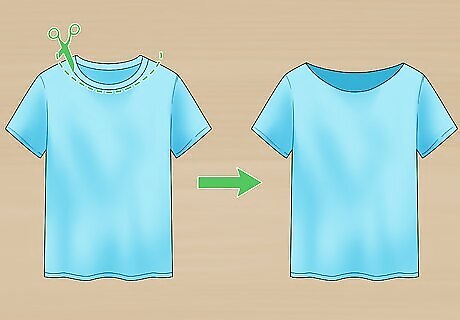
Create a wider neckline by cutting out the neck seam. Removing the collar from a t-shirt will make it wider than a typical crew neck. This is a great way to get a slouchy, off-the-shoulder look with any shirt in your closet! All you have to do is cut along the thick hem with a pair of scissors. The more of the collar you take off, the wider the neckline will be. Cut less at first, try the shirt on, and then cut more to fit your preferences. To make sure the front and back of your neckline are symmetrical, fold the shirt in half, so the shoulder seams line up and the neckband is folded evenly on itself. Then, cut below the band, following its original curve. Create a v-neck by folding the shirt so the shoulder seams line up. Then, cut the neckline at a diagonal (like a triangle) to create a point instead of a curve.
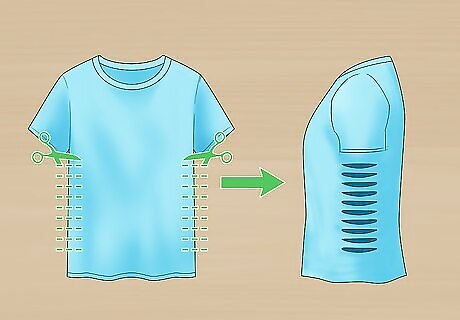
Cut slits into the sides or back of your shirt. Make “fish gills” in your shirt by cutting even horizontal strips down each side. Lay the shirt on a flat service, iron out any wrinkles, and then make 1 to 2 in (2.5 to 5.1 cm) cuts from the bottom of the sleeve to the bottom hem through both layers of fabric. Use a similar technique to create back slits, but only cut the back-most layer of fabric. This is an excellent way to make a tight shirt a bit looser, as the more slits the shirt has, the more forgiving it’s be. Play around with the length and direction of your cuts. Try create vertical slits for an edgier look, or make some holes bigger than others for a distressed look.
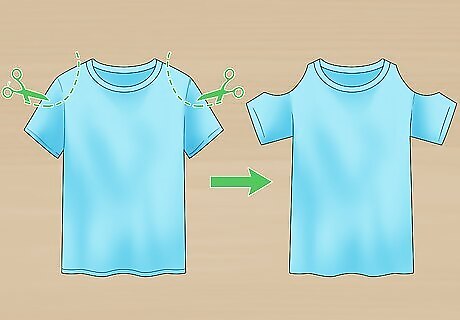
Make shoulder cutouts for a feminine and cute look. Create an easy peek-a-boo shoulder by simply cutting a half-circle out of each upper arm of your t-shirt. Simply lay the t-shirt on a flat surface and find where the shoulder seams meet with the armhole seams. Cut a piece out of 1 shoulder, avoiding the neck and armhole seams. Repeat on the opposite side. Save the first piece of fabric you cut from the shoulder to use as a guide for the other side. This way, your cuts will be symmetrical.
Edgy Woven Neck & Back Design
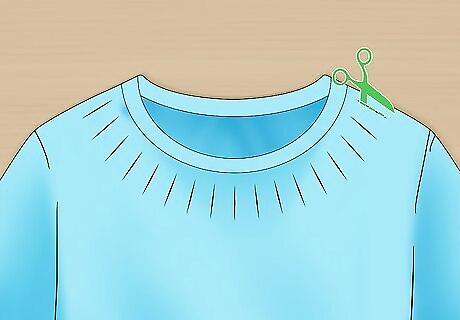
Cut vertical slits along the collar for a neckline weave. Create small, vertical slits around the bottom band of the collar (below the collared hem). Use a fabric measuring tape to evenly space out each cut with a pencil or fabric marker—the closer the cuts are, the tighter the weave will be. Then, create 2 in (5.1 cm) cuts on the top layer of fabric fanning out from the neckline, following your markings. When you’re done cutting, stretch the fabric out on either side of each slit. This will make the fabric easier to weave and manipulate. Keep in mind that weaving parts of a shirt will make it tighter, so opt to do this design on a baggier shirt for the best results.
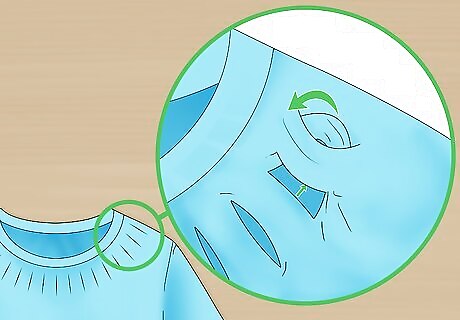
Pull the second piece of cut fabric through the first to start weaving. Pick up the piece of fabric between the first two cuts you made. Then, bring the second piece of fabric under and over the first piece, creating a loop. For a braided look, pull the second piece of fabric under the first, then twist it once before moving onto the next step.
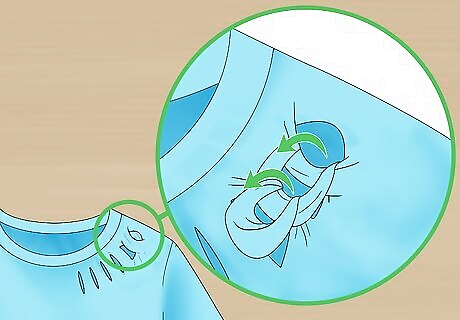
Weave each piece up and over the loop before it. Take the third piece of fabric and pull it under, up, and over the loop you created with the first two pieces. Continue pulling the next piece through the former loop until you’ve reached the end of your cuts. If you’re making a braided weave, remember to twist each loop once before you pull it through the next piece. When you reach the end and you have a final loop with nothing to pull through it, cut the loop in half. Tie the 2 halves together to secure your weave in place.
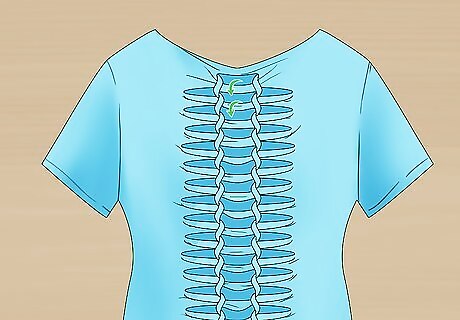
Pull the cut fabric up and over each other on the back of your t-shirt. If you also cut slits along the back of your shirt, follow the same steps as above to repeat the weaving pattern. Pull the first piece of fabric under and over the next piece of fabric to create a loop. Then, bring that loop up and over the next piece. Continue this weaving pattern until you reach the bottom of the shirt. Secure your design by cutting the last piece of fabric in half and tying it in place.
Adorable Sleeve & Back Bow Details
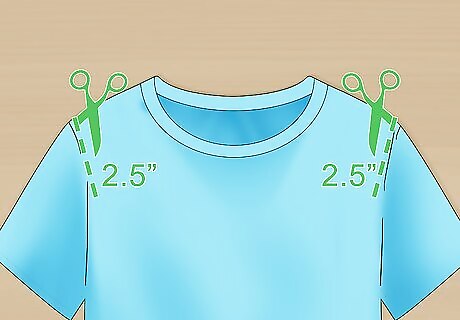
Cut a 2.5 in (6.4 cm) slit in each shoulder of your t-shirt. Lay your shirt on a flat surface, smoothing out any wrinkles. Then, use a pair of scissors to cut a 2.5 in (6.4 cm) line along the shoulder of each arm.
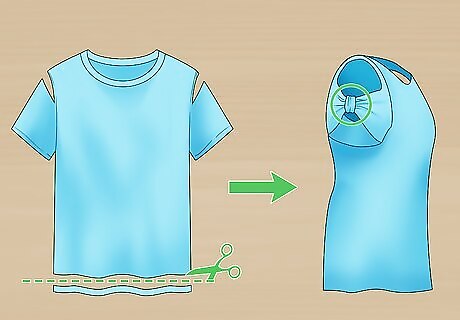
Trim off the shirt’s hem and use the extra fabric to tie the bows in place. Take between 1 to 2 in (2.5 to 5.1 cm) off the bottom of the shirt. Then, cut the long strip of excess fabric in half. Gather the upper part of one sleeve to create a bow-like shape, bringing fabric between the cut slit and sleeve end together. Wrap the long strip of cut hem around the middle of the gathered fabric to create a bow. Repeat on the other sleeve. The more fabric you take off the bottom of the shirt, the thicker your bow’s band will be. If you like the length of your shirt, try trimming off the bottom sleeve hem to make your bow’s band instead. Consider sewing the bow’s band in place or securing it in place with fabric glue.
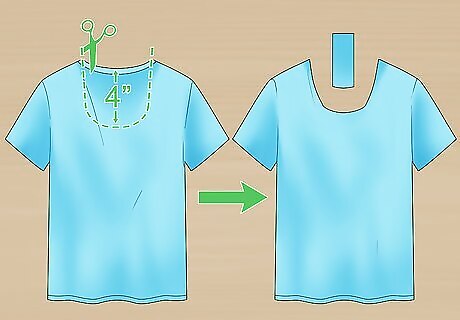
Create a scooping neckline for a bow-back shirt. Flip your shirt over so the back is facing you. Then, cut out a 4 in (10 cm) long neckline with scissors. Start at the edge of the original collar, bringing the neck down to create a narrow “U” shape. Save the excess fabric, as you’ll be needing it later. The lower you cut the back of the neckline, the lower on your back the bow will be.
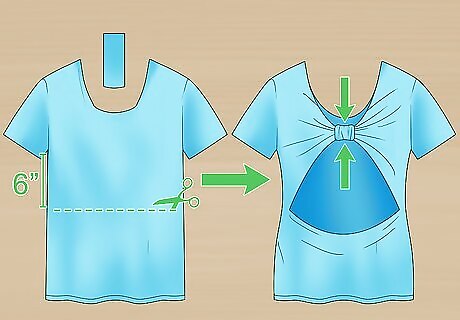
Make a slit across the back and gather the fabric to make a bow. Create a cut across the back of the shirt (only slicing the back piece of fabric), about 6 in (15 cm) down from each armpit. Gather the fabric between this cut and the neckline together. Then, tie the extra fabric together with the strip of excess fabric from the neckline to form a bow. Make sure to start and end your back cut just inside the side seams of your shirt; otherwise, the cut can grow wider and stretch around the sides overtime. Sew the bow’s band in place or use a dab of fabric glue to ensure it doesn’t come undone.








Comments
0 comment