
Configuring Visual Studio
Highlight what you expect to do. Highlight step or sub-step you expect to do and then do it. See as example picture above.
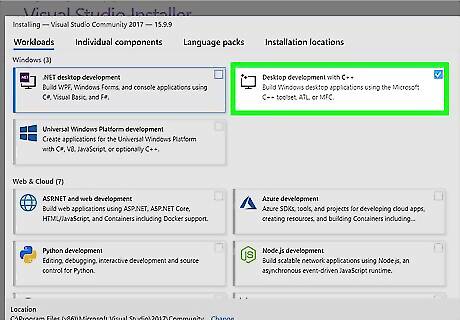
Download Visual Studio 2022. If you have not done so you can download it from https://www.visualstudio.com/downloads. Check the Desktop development with C++ workload box as you download. If necessary scroll down the page. Click "Language pack" and check "English" box. Set Up SDL with Visual Studio 2017 Step 3 Version 2.jpg
Downloading SDL and GLEW
Create folders GL and GLP. Open Windows's File Explorer > Navigate to disk (directory) C. If folders GL and GLP exist it's okay. If they do not, right click in empty area > select New > Folder > type GL > hit ↵ Enter. By same way create folder GLP.
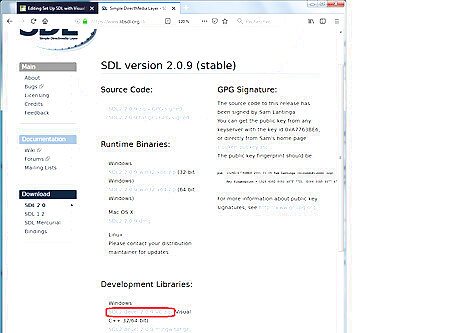
Download library SDL2. Right click on following link and select Open Link in New Window https://www.libsdl.org/download-2.0.php. Scroll to the bottom of the page and find Development Libraries (see picture above) . Download the version for Visual C++. Today (12 July 2022) it is SDL2-devel-2.0.22-VC.zip (Visual C++ 32/64-bit). In the window where it is downloaded, click SDL2-2.0.22 (or the latest) > right click > select Copy. Navigate (always by double click) to C: > GL > click in empty area > right click > select Paste. (Alternatively, click downloaded folder and drag into C:\GL) Click on name SDL2-2.0.22 > right click > select "Rename" > type SDLbin > .
Download library GLEW. Right click on following link and select Open Link in New Window http://glew.sourceforge.net/. Below Downloads find Binaries and click Windows 32-bit and 64-bit. In the window where it is downloaded, click folder glew-2.1.0 > right click > select Copy. Navigate to C: > GL > right click > select Paste. (Alternatively, click downloaded folder and drag into C:\GL) Rename glew-2.1.0 to GLEWbin. If folder glew-2.1.0-win32 is downloaded, double click it for get glew-2.1.0. Now in GL folder you have folders GLEWbin and SDLbin.
Creating project SDLx32-GLEWx32-0
Create an empty project. If Visual Studio is not open. Open it > Click Create a new project > Empty Project > Next. In Configure your new project wizard, for "Project name", type (or copy and paste): SDLx32-GLEWx32-0 Copy C:\GLP\ and paste in "Location" text field. Check "Place solution and project in the same directory". Click Create. Wait till Visual Studio instance appears. If it is open. Click File > New > Project… . The rest as above.
Add your source file to the Project. In the Solution Explorer window, right click the Source Files entry (the last one) > select Add > New Item…. In the Add New Item - SDLx32-GLEWx32-0 window, click C++ File (.cpp) (the first one) from the middle of the window. In Name text box type (or copy and paste) Main.cpp The Location is C:\GLP\SDLx32-GLEWx32-0\ Click the Add button. The file will open in the main text editor but leave the file blank for now.
Setting Up SDL and GLEW in Project

Configure project's Properties. In Solution Explorer right click on the name of your project, that is SDLx32-GLEWx32-0 and select Properties. In "SDLx32-GLEWx32-0 Property Pages" wizard,
1. Main menu. In Configuration entry select Active(Debug) > in Platform: entry, select "x32" (or "Win32") > Click Configuration manager.... In Configuration Manager wizard,
Active solution platform: select "x32" (or "x86")
Platform entry, "x32" or "Win32" is automatically selected.
Click Close
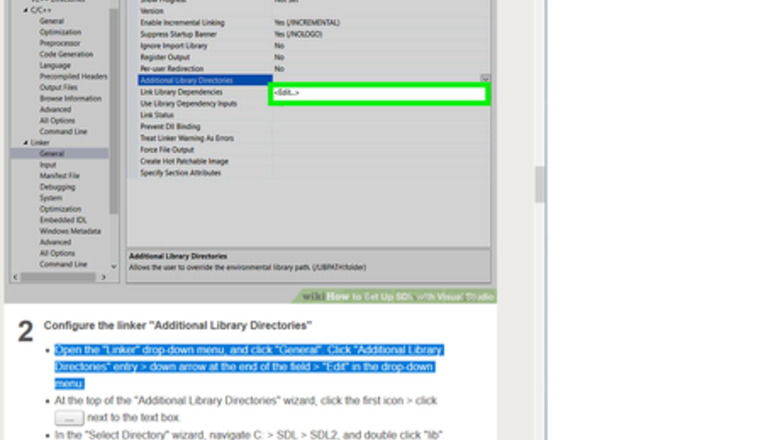
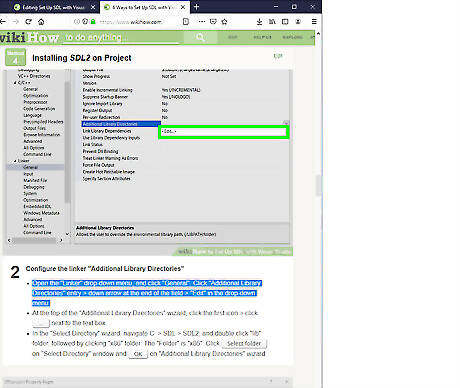
2. Additional Include Directories. Opengl 1.png OpenGL 12.png Open the C/C++ drop-down menu. Click General > Additional Include Directories > down arrow at the right of the field > click
Add dll files paths (addresses) to "System Variables". In search text field of Windows (bottom left of the screen) type envir > hit ↵ Enter. "System Properties" wizard is thrown. Select the "Advanced" tab from the top bar > click Environment Variables.... "Environment Variables" wizard is thrown. Double click the "Path" (or "PATH") Variable in the "System Variables" section. "Edit environement variable" wizard is thrown. Copy C:\GL\SDLbin\lib\x86 > click New > Paste. Copy C:\GL\GLEWbin\bin\Release\Win32 > click New > Paste. Click OK in all 3 wizards. Close Visual Studio > in thrown wizard "Save changes to the following items?" click Save. Restart your PC > open Visual Studio. If project is open, it's okay. If it's not, in "Open recent" list, click "C:\GLP\SDLx32-GLEWx32-0" or "SDLx32-GLEWx32-0.sln", the first one. Now your project is open ready for test.
Testing project and Correcting errors

Test project. Right click on following link and select Open Link in New Window http://lazyfoo.net/tutorials/SDL/51_SDL_and_modern_opengl/index.php > Scroll down to last sentence "Download the media and source code for this tutorial here". Click here > download 51_SDL_and_modern_opengl.cpp (or .zip) folder. Double click it > double click file of same name. Its code will appear in Visual Studio by the side of Main.cpp file or in new Visual Studio instance. Copy code (413 lines) and paste on Main.cpp code area > if code appears in a file by the side of Main.cpp, delete this file > hit Ctrl+F5. If everything is gone well two windows appear: one black and one with title: SDL Tutorial and inside a white square with black background. Lazyfoo 2.png
Correct errors if any. Files are missing. Copy C:\GLP\SDLx32-GLEWx32-0 and paste in File Explorer Address Bar > hit Enter. You should see file you added Main.cpp, and 4 other files added by Visual Studio. If they are missing you missed add file Main.cpp. Go to Part 3, step 2, and add it now. In "Error List" if you see error about file with extension .h go to previous Part, step 1, sub-step 2. Additional Include Directories and follow instructions. file with extension .lib go to previous Part, step 1, sub-step 3. Additional Library Directories, and follow instructions. Also to sub step 4. Additional Dependencies. "entry point must be defined" go to sub-step 5. System and follow instructions. Thrown wizard about System or dll file, go to previous Part, steps 2 and 3, and follow instructions. For other errors, if you cannot correct them, close Visual Studio > delete project folder SDLx32-GLEWx32-0 which lives in C:\GLP > open Visual Studio > repeat set up from Part 3. Good job.
Creating Project with SDLx32-GLEWx32-0 Template
Create template. Go to Visual Studio main menu and, while project SDLx32-GLEWx32-0 is open, click Project > Export Template.... On Export template Wizard check Project Template, if it's not checked. Click Next >. On Select Template Options, if Template name is SDLx32-GLEWx32-0 it's okay. If it's not, type (or copy and paste) SDLx32-GLEWx32-0 > click Finish. Template has been created. Delete thrown window with template's path.
Create project. In Visual Studio main menu, select x86 > click File > New > Project.... In Create a new project wizard, in the list of templates, select SDLx32-GLEWx32-0 > click Next. In Configure your new project wizard, "Project name" should be SDLx32-GLEWx32-01. Location text field should be C:\GLP\. If it's not, copy C:\GLP\ and paste. Be sure Place solution and project in the same directory is checked. Click Create. In Visual Studio's GUI main menu, select x86 > hit Ctrl+F5. If everything is gone well two windows appear: one black and one with title: SDL Tutorial and inside a white square with black background. Lazyfoo 2.png TIP. When you create project with this template remember in Visual Studio main menu select x86.
Creating project to target x64 platform
Create folders GL and GLP. Open Windows's File Explorer > Navigate to disk (directory) C. If folders GL and GLP exist it's okay. If they do not, right click in empty area > select New > Folder > type GL > hit ↵ Enter. By same way create folder GLP.
Download libraries SDL and GLEW. If you have not already downloaded them go to Part 2 and follow it.
Create an empty project. If Visual Studio is not open. Open it > Click Create a new project > Empty Project > Next. In Configure your new project wizard, for "Project name", type (or copy and paste) SDLx64-GLEWx64-0 "Location" should be C:\GLP. If it's not, delete everything, copy C:\GLP\ and paste. Check "Place solution and project in the same directory". Click Create. Wait till Visual Studio instance appears. If it is open. Click File > New > Project… . The rest as above.
Add your source file to the Project. In the Solution Explorer window, right click the Source Files entry (the last one) > select Add > New Item…. In the Add New Item - SDLx64-GLEWx64-0 window, click C++ File (.cpp) (the first one) from the middle of the window. In Name text box type (or copy and paste) Main.cpp The Location is C:\GLP\SDLx64-GLEWx64-0\. If it's not copy C:\GLP\SDLx64-GLEWx64-0\ and paste. Click the Add button. The file will open in the main text editor but leave the file blank for now.
Installing SDLx64 and GLEWx64 in the Project
Configure "Properties Pages". Go to "Solution Explorer" > right click on the name of your project that is SDLx64-GLEWx64-0 > select "Properties". In SDLx64-GLEWx64-0 Property Pages wizard,
1. Main menu. In "Configuration:", check "Active(Debug)". In "Platform:", check x64 > Click Configuration manager....
In "Configuration Manager" wizard
In Active solution platform: select x64
In Platform, x64 is automatically selected.
Click Close
2. Additional Include Directories. Open the C/C++ drop-down menu. Click General > Additional Include Directories > down arrow at the right of the field > click
Add dll files paths (addresses) to "System Variables". In search text field of Windows (bottom left of the screen) type envir > hit ↵ Enter. "System Properties" wizard is thrown. Select the "Advanced" tab from the top bar > click Environment Variables.... "Environment Variables" wizard is thrown. Double click the "Path" (or "PATH") Variable in the "System Variables" section. "Edit environement variable" wizard is thrown. Copy C:\GL\SDLbin\lib\x64 > click New > Paste. Copy C:\GL\GLEWbin\bin\Release\x64 > click New > Paste. Click OK in all 3 wizards. Close Visual Studio > in thrown wizard "Save changes to the following items?" click Save. Restart your PC > open Visual Studio. If project is open, it's okay. If it's not, in "Open recent" list, click C:\GLP\SDLx64-GLEWx64-0 or "SDLx64-GLEWx64-0.sln", the first one. Now your project is open ready for test.
Testing project and Correcting errors

Test project. Right click on following link and select Open Link in New Window http://lazyfoo.net/tutorials/SDL/51_SDL_and_modern_opengl/index.php > Scroll down to last sentence "Download the media and source code for this tutorial here". Click here > download 51_SDL_and_modern_opengl.cpp (or .zip) folder. Double click it > double click file of same name. Its code will appear in Visual Studio by the side of Main.cpp file or in new Visual Studio instance. Copy code (413 lines) and paste on Main.cpp code area > if code appears in a file by the side of Main.cpp, delete this file > hit Ctrl+F5. If everything is gone well two windows appear: one black and one with title: SDL Tutorial and inside a white square with black background. Lazyfoo 2.png
Correct errors. Files are missing. Copy C:\GLP\SDLx64-GLEWx64-0 and paste in File Explorer Address Bar. You should see file you added Main.cpp, and 4 other files added by Visual Studio. If they are missing you missed add file Main.cpp. Go to Part 7, step 4, and add it now. In "Error List" if you see error about file with extension .h, go to previous Part, step 1, sub-step 2. Additional Include Directories, and follow instructions. file with extension .lib, go to previous Part, step 1, sub-step 3. Additional Library Directories and follow instructions. Also to sub-step 4. Additional Dependencies. "entry point must be defined" go to previous Part, step 4, sub-step 5. System, and follow instructions. Thrown wizard about System or dll file, go to previous Part, steps 2 and 3, and follow instructions. For other errors. If you can't correct them, close Visual Studio > delete project folder SDLx64-GLEWx64-0 which lives in C:\GLP > open Visual Studio > repeat set up from Part 7. Good job.
TIP: Even if in Property Pages main settings it is Platform: x64, click Configuration manager... and in Active solution platform: select x64.
Creating Project targeting x64 platform, with Template
Create template. Go to main menu and, while project SDLx64-GLEWx64-0 is open, click Project > Export Template.... On Export template Wizard check Project Template, if it's not checked. Click Next >. On Select Template Options, Template name should be SDLx64-GLEWx64-0 > click Finish. Template has been created. Delete thrown window with template's path.
Create project. In Visual Studio main menu, select x64 > click File > New > Project.... In Create a new project wizard in the list of templates select SDLx64-GLEWx64-0 (if necessary scroll down the list)> click Next. In Configure your new project wizard, "Project name" should be SDLx64-GLEWx64-01. If Location text field is C:\GLP\ it's okay. If it's not, copy C:\GLP\ and paste. Be sure Place solution and project in the same directory is checked. Click Create. In Visual Studio's GUI main menu, select x64 > hit Ctrl+F5. TIP. When you create project with this template remember in Visual Studio GUI's main menu select x64.
Installing CMake
Compiling a library from the source code guarantees that the resulting library is perfectly tailored for your CPU/OS, a luxury pre-compiled binaries don't always provide. It is also important that binaries you get target x64 platform.
Create folders GL and GLP. Open Windows's File Explorer > Navigate to disk (directory) C. If folders GL and GLP exist it's okay. If they do not, right click in empty area > select New > Folder > type GL > hit ↵ Enter. By same way create folder GLP.
Download CMake. Right-click on following address and select Open Link in New Window https://cmake.org/download/. Scroll down the page and find "Latest Release (3.21.3)", (or newer). In second "Platform" list, find "Windows x64 ZIP" and click the beside entry cmake-3.23.2-windows-x86_64.zip > in opening wizard select Save file.
Copy and unzip the zip folder. If downloaded folder's icon contains vertical line with stripes (zipped folder), click folder > right click > in drop-down menu select Extract all. When unzipping (extracting files) is finished, click unzip folder cmake-3.23.2-windows-x86_64.zip (or newer) > right click > Copy. If downloaded folder doesn't contain line with stripes (unzipped folder) click it > right click > Copy. Go to drive (directory) C: > GL > right click > Paste. When copying is finished click folder > right click > select "Rename" > type CMake > hit ↵ Enter > double click folder > double click folder bin > inside you should see CMake's logo next to file name cmake-gui > double click this file. If wizard "Windows protect your PC" appears, click More information > Run anyway. Now on your screen you have CMake GUI. Each time you need CMake, navigate to C:\ > GL > double click folder CMake > double click folder "bin" > double click file cmake-gui (the one with CMake's logo). CMake's GUI appears.
Compiling Source Code with CMake and Visual Studio
Download SDL source. If you don't already have installed SDL source, right-click on following address and select Open Link in New Window https://www.libsdl.org/download-2.0.php. Below Source Code: click SDL2-2.0.16.zip (or latest version). Be aware of the beside "GPG". In downloading window click zip folder SDL2-2.0.14.zip (or latest version) > right click > select Copy. In File Explorer navigate to C:\ > GL > right click > select Paste. Click twice on folder's name > delete name > type: SDLsrc > hit ↵ Enter.
Download GLEW source. If you don't have already downloaded it, right-click on following address and select Open Link in New Window http://glew.sourceforge.net/. Beside Source click ZIP. In downloading window click folder glew-2.1.0 (or latest) > right click > Copy. Navigate to C:\ > GL. Right click > Paste. Click twice on folder's name and rename to GLEWsrc > hit ↵ Enter. Now in folder GL you have folders SDLsrc and GLEWsrc.
Build SDL by CMake and Visual Studio. Go to CMake GUI. Copy (attention: do not copy any space)C:/GL/SDLsrc and paste in first text field. Copy (attention: do not copy any space)C:/GL/SDLsrc/build and paste in second text field. Configure and generate. In CMake GUI, click Configure > in wizard Create Directory click Yes > in wizard "Specify the generator for this project" click Finish. If, instead, wizard "Error" is thrown, click OK > click "File" > click "Delete Cache" > in thrown wizard "Delete Cache", click Yes. When, in CMake GUI, you read: "Configuring done", click Generate. You should read: "Generating done". Build your solution. Navigate to C: > GL > SDLsrc> build. Double click "SDL2.sln", or "SDL2", or "ALL_BUILD.vcxproj". An instance of Visual Studio appears. Wait until in main menu Build entry appears. Click it > "Build Solution". Wait till you read the last line in "Output" window: ========== Build: XX succeeded, 0 failed, 0 up-to-date, 2 skipped" ========== Number XX of "succeeded" changes in freeglut versions. Today (12 July 2022) is 5. Navigate to C:\GL\SDLsrc\build\Debug. Inside you should see file SDL2d.lib among other files.
Build GLEW by CMake and Visual Studio. Go to Cmake GUI. Copy (attention: do not copy any space)C:/GL/GLEWsrc/build/cmake and paste in first text field. Copy (attention: do not copy any space)C:/GL/GLEWsrc/build and paste in second text field. Configure and generate. In CMake GUI, click Configure > in wizard Create Directory click Yes > in wizard "Specify the generator for this project" click Finish. If, instead, wizard "Error" is thrown, click OK > click "File" > click "Delete Cache" > in thrown wizard "Delete Cache", click Yes. When, in CMake GUI, you read: "Configuring done", click Generate. You should read: "Generating done". Build your solution. Navigate to C: > GL > GLEWsrc > build. Double click "glew.sln", or "glew", or "ALL_BUILD.vcxproj". An instance of Visual Studio appears. Wait until in main menu Build entry appears. Click it > "Build Solution". Wait till you read the last line in "Output" window: ========== Build: 6 succeeded, 0 failed, 0 up-to-date, 2 skipped" ========== Number of succeeded may change in later GLEW versions. Navigate to C: > GL > GLEWsrc > build > lib > Debug. Inside you should see file glew32d.lib among other files. Close Visual Studio GUI and Cmake GUI.
Setting up built SDL and built GLEW in project
Create an empty project. If Visual Studio is not open. Open it > Click Create a new project > Empty Project > Next. In Configure your new project wizard, Copy SDLsrc-GLEWsrc-0 and paste in "Project name", text field. If "Location" is "C:\GLP\" it's okay. If it's not, copy C:\GLP\ > in "Location" text field delete everything > paste. Check "Place solution and project in the same directory". Click Create. Wait till Visual Studio instance appears. If it is open. Click File > New > Project… . The rest as above.
Add source file to project. In Visual Studio GUI, Solution Explorer window, right click Source Files entry (the last one) > select Add > New Item…. In Add New Item - SDLsrc-GLEWsrc-0 window, click C++ File (.cpp) (the first one) from the middle of the window. In Name text box type (or copy and paste) Main.cpp Location is C:\GLP\SDLsrc-GLEWsrc-0\. If it's not copy C:\GLP\SDLsrc-GLEWsrc-0\ and paste. Click Add button. The file will open in the main text editor but leave the file blank for now.
Installing SDLsrc and GLEWsrc on the Project
Configure project's Properties. In Solution Explorer wizard, right click Project's name that is SDLsrc-GLEWsrc-0 > select Properties. In "SDLsrc-GLEWsrc-0 Property Pages" wizard. 1. Main menu. In Configuration: select Active(Debug) > in Platform entry, select x64 > click Configuration Manager.... In Active solution platform: select x64. In Platform entry, x64 is automatically selected. Click Close. 2. Additional Include Directories. Open C/C++ > General > In beside menu select the first one, Additional Include Directories > click the down arrow at the end of the field > click Edit.... 1. Copy C:\GL\SDLsrc\include > in Additional Include Directories wizard, click first icon > paste. 2. Copy C:\GL\GLEWsrc\include > click again first icon > paste. Click OK in Additional Include Directories wizard. 3. Additional Library Directories. Double click Linker > click General > Additional Library Directories > click the down arrow at the end of the field > click Edit.... 1. Copy C:\GL\SDLsrc\build\Debug > in Additional Library Directories click first icon > paste. 2. Copy C:\GL\GLEWsrc\build\lib\Debug > click again first icon > paste. Click OK in Additional Library Directories wizard. 4. Additional Dependencies. In Linker drop-down menu select Input > in beside menu select the first one, Additional Dependencies > click the down arrow at the end of the field > Edit... Copy opengl32.lib; SDL2d.lib; SDL2maind.lib; glew32d.lib and paste in Additional Dependencies wizard's upper-most text box. Click OK in Additional Dependencies wizard. 5. System. In Linker drop-down menu select System > in beside menu select the first one, SubSystem > click the down arrow at the end of the field > select Console (/SUBSYSTEM:CONSOLE). In SDLsrc-GLEWsrc-0 Property Pages wizard, click Apply and then OK.
Add dll files paths (addresses) to "System Variables". The straight way for configure dll file with Windows System is adding its address (path) to PATH (or Path) Variable in Windows "System Variables". It demands restart your PC though. If you do not want restart it, follow next step "Alternatively place dll file into folder System32". If you prefer the straight way do this In search text field of Windows (bottom left of the screen) type envir > hit ↵ Enter. "System Properties" wizard is thrown. Select the "Advanced" tab from the top bar > click Environment Variables.... "Environment Variables" wizard is thrown. Double click the "Path" (or "PATH") Variable in the "System Variables" section. "Edit environment variable" wizard is thrown. Copy C:\GL\SDLsrc\build\Debug > click New > Paste. Copy C:\GL\GLEWsrc\build\bin\Debug > click New > Paste. Click OK in all 3 wizards. Close Visual Studio > in thrown wizard "Save changes to the following items?" click Save. Restart your PC > open Visual Studio. In "Open recent" list, click "C:\GLP\SDLsrc-GLEWsrc-0" or "SDLsrc-GLEWsrc-0.sln", the first one. Now your project is open ready for test.
Testing Project SDLsrc-GLEWsrc-0 and Correcting errors

Test project. Right click on following link and select Open Link in New Window http://lazyfoo.net/tutorials/SDL/51_SDL_and_modern_opengl/index.php > Scroll down to last sentence "Download the media and source code for this tutorial here". Click here > download 51_SDL_and_modern_opengl.cpp (or .zip) folder. Double click it > double click file of same name. Its code will appear in Visual Studio by the side of Main.cpp file or in new Visual Studio instance. Copy code (413 lines) and paste on Main.cpp code area > if code appears in a file by the side of Main.cpp, delete this file > hit Ctrl+F5. If everything is gone well two windows appear: one black and one with title: SDL Tutorial and inside a white square with black background. Lazyfoo 2.png
Correct errors. Files are missing. Copy C:\GLP\SDLsrc-GLEWsrc-0 and paste in File Explorer Address Bar. You should see file you added Main.cpp, and 4 other files added by Visual Studio. If they are missing you missed add file Main.cpp. Go to Part 13, step 2, and add it now. In "Error List" if you see error about file with extension .h, go to previous Part, step 1, sub-step 2 Additional Include Directories, and follow instructions. file with extension .lib, go to previous Part, step 1, sub-step 3 Additional Library Directories and follow instructions. Also to sub-step 4 Configure Additional Dependencies. "entry point must be defined" go to previous Part, step 1, sub-step 5 System, and follow instructions. Thrown wizard about System or dll file, go to previous Part steps 2 and 3, and follow instructions For other errors. If you can't correct them, close Visual Studio > delete project folder SDLsrc-GLEWsrc-0 which lives in C:\GLP > open Visual Studio > repeat set up from Part 13. Good job. TIP: Even if in Property Pages main settings it is Platform: x64, click Configuration manager... and in Active solution platform: select x64.
Creating Project with SDLsrc-GLEWsrc-0 Template
Create template. Go to Visual Studio main menu and, while project SDLsrc-GLEWsrc-0 is open, click Project > Export Template.... On Export template Wizard check Project Template, if it's not checked. Click Next >. On Select Template Options, if Template name is SDLsrc-GLEWsrc-0 it's okay. If is not copy and paste SDLsrc-GLEWsrc-0 > click Finish. Template has been created. Close thrown window with template's path.
Create project. In Visual Studio main menu, select x64 > click File > New > Project.... In Create a new project wizard, in the list of templates select SDLsrc-GLEWsrc-0 (if necessary scroll down the list) > click Next. If "Project name" is SDLsrc-GLEWsrc-01, it's okay. if it's not, copy SDLsrc-GLEWsrc-01 and paste in "Project name" text field. If Location is C:\GLP, it's okay. If it's not, copy C:\GLP and paste. Be sure Place solution and project in the same directory is checked. Click Create. In Visual Studio GUI's main menu select x64 (next to Debug) > hit Ctrl+F5. Good job TIP: Remember, in every project you create with this template, select x64 (next to Debug) in Visual Studio's GUI.


Comments
0 comment